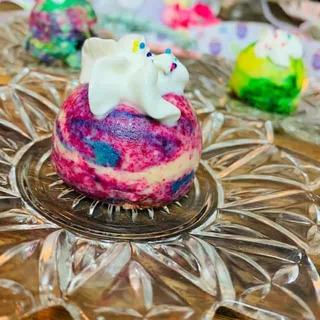
Easter Egg Mini Cheesecakes! Pressure Cooker Recipe
The Tasty Travelers Easter Egg Mini Cheesecakes with an egg "yok" in the middle! These came out soooo cute! Side note- This would be an awesome treat for a baby gender reveal party too! You could totally fill them with pink or blue cheesecake! How cute would that be!
Author: The Tasty Travelers
Meal Type: Easter
Cuisine: American
Difficulty: MEDIUM
Prep. Time: 25 minutes
Cook Time: 50 minutes
Total Time: 1 hour 15 minutes
Servings: 84 slices
Calories: 25 kcal per serving
Ingredients
- 1 - Oreo Cookie
- Cooking spray
- 12 ounce - Cream Cheese
- ¾ cup - White Sugar
- 3 - Eggs
- 1 ½ teaspoon - Vanilla
- 1 cup - Water
Instructions
- Open up a pack of Oreo cookies....that's it...you're done! :)
- Add the room temperature cream cheese to to a large mixing bowl. Mix using a hand mixer until the cream cheese breaks up fully in the bowl. This should take about 15 seconds. If you don't have a hand mixer, it's ok! Just do not over mix.
- Scrape the bowl with a spatula (I use my spoonulas for this and they work perfectly!) and add in the sugar. Mix just until incorporated. This should take about 15 seconds.
- Scrape the bowl with a spatula and add in the eggs. This should take about 15 seconds.
- Scrape the bowl with a spatula and add in the vanilla. This should take about 15-30 seconds.
- Once you have your batter, it's time to color it!
- If you would like to color each egg a different color, separate your batter into 8 portions. My egg bite bowl has 7 portions. So, since I wanted to give each egg cheesecake a yolk, I added an 8th portion for the yellow yolk color. I poured mine into little ramekins.
- If you want all of your eggs to be the same color, or marbled, then just separate out about 1/2 cup of batter to use as the yellow yolk filling.
- It's time to color the "eggs!" Add a drop or two of food dye into each ramekin of batter and mix together. If you are making all of your eggs the same color, add more food dye until the desired color is achieved. For a marbled effect, add in a drop or two of each color and gently stir together. You don't want to over stir as you want to be able to see all of the colors. For the "yolk" coloring, just add yellow....a few extra drops to make it extra yellow!
- Place your egg bite mold on to your sling. If you don't have a sling, you can buy one here or make one using aluminum foil.
- Spray the egg molds lightly with cooking spray.
- Pour the already dyed cheesecake batter into the egg mold. Do not fill all the way to the top. You want about 1/2 inch to 3/4 inch left at the top.
- Pour your yellow cheesecake batter into a piping bag or ziplock bag. I used a piping bag and tip #1M. But, you can just as easily use a ziplock bag. If you are using a ziplock bag, pour the cheesecake into the bag and then cut off about 1/2 an inch of the corner. This will create a homemade piping bag for you!
- Squeeze the yellow cheesecake batter towards the end of the bag. You want to make sure that only cheesecake batter and not air gets piped into your mini cheesecakes.
- Insert the piping tip or ziplock bag into the egg cheesecakes about half an inch and gently squeeze the yellow cheesecake batter into the egg cheesecakes. A little goes a long way. Do not squeeze too hard or the "yolk" will start to come out of the cheesecake. Squeeze until you have about 1/2 a tablespoon of yolk in each cheesecake.
- Once all of your egg cheesecakes have their "yolks," top each with an Oreo cookie. Be careful not to push them down too hard. You don't want the Oreo cookie to be covered in cheesecake.
- Cover egg bite mold with 1 piece of paper towel and then foil. This will help prevent the crust from becoming soggy.
- Add the trivet to the pressure cook and pour in one cup of water.
- Place the sling with your egg bite mold onto the sling.
- Close the pressure cooker, set the valve to seal and cook on high pressure for 35 minutes.
- When the timer beeps, let the pressure release naturally. This will take 15 to 20 minutes.Once pressure has fully released, take the lid off and remove the sling and egg bite mold.
- Take off the foil and paper towel.
- Place the Easter Egg Mini Cheesecakes in the refrigerator until cooled. Since they are small, this should not take too long. If you are in a hurry, you can also put the cheesecakes in the freezer to cool for a few minutes. Be sure that your Easter Egg Mini Cheesecakes are level while cooling or you will end up with lopsided cheesecakes.
- Once cooled, gently flip the Easter Egg Mini Cheesecakes over onto a plate or cutting board. If cheesecakes do not slide ride out, gently tap or squeeze the egg bite mold. If needed, you can use a butter knife to gently separate the cheesecake from the edges of the mold. DO NOT SCOOP the cheesecakes out of the mold. You will end up with a cheesecake casserole lol.
- When ready to eat, slice down the center to show the "yolk!"
Nutrition
Energy: 25 kcal | Total Fat: 2 g | Saturated: 1 g | Trans: 0 g | Unsaturated: 0 g | Cholesterol: 11 mg | Total Carbs: 2 g | Fiber: 0 g | Sugars: 2 g | Proteins: 0 g | Sodium: 16 mg | Polyunsaturated: 0 g | Monounsaturated: 0 g
©2026 OnlineCook LLC