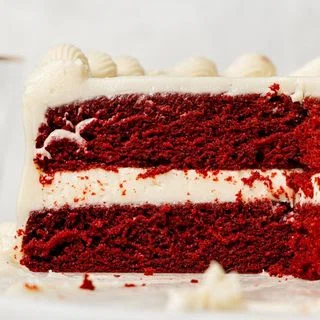
Red Velvet Layer Cake
My red velvet layer cake consists of two sponges with a velvety, melt-in-your-mouth texture, subtle cocoa flavor, and eye-catching bright red color all enrobed in a tangy cream cheese frosting. This iconic cake is perfect for celebrating Valentine's Day or any other special occasion!
Author: Sloane’s Table
Meal Type: Peanuts Free
Cuisine: American
Difficulty: MEDIUM
Prep. Time: 1 hour
Cook Time: 30 minutes
Total Time: 1 hour 30 minutes
Servings: 16 slices
Calories: 601 kcal per serving
Ingredients
- 2 cups - all-purpose flour
- ¼ cup - Dutch-process cocoa powder
- ¾ tsp - baking soda
- ½ tsp - salt
- 8 tablespoons - unsalted butter
- 1 ⅓ cups - granulated sugar
- 2 - eggs
- 2 teaspoons - vanilla extract
- ½ cup - buttermilk
- ½ cup - plain whole-milk Greek yogurt
- ½ cup - neutral oil
- 2 teaspoons - distilled white vinegar
- 1 tsp - red food gel
- 24 tablespoons - unsalted butter
- 18 ounces - cream cheese
- 4 ½ cups - powdered sugar
Instructions
- Preheat the oven to 350 degrees F.
- Grease and line two 9" cake pans with parchment paper.
- Soak two cake strips in ice water.
- In a medium bowl, whisk together the flour, cocoa powder, baking soda, and salt. Set aside.
- In the bowl of a stand mixer fitted with a paddle attachment, cream the butter and sugar together until light and fluffy, about 2-3 minutes.
- Mix in the egg yolks and vanilla until well combined.
- Add half of the dry ingredients and mix on low speed until mostly combined. Then, mix in the buttermilk, yogurt, oil, vinegar, and red food gel, followed by the remaining dry ingredients.
- In a separate small bowl, add the egg whites and use an electric hand mixer to beat until soft peaks form.
- Using a rubber spatula, gently fold the whipped egg whites into the cake batter until fully combined.
- Divide the cake batter between the prepared cake pans. Wrap the cake strips around the outsides of the pans.
- Bake the cakes for about 30-35 minutes or until the edges start to pull away from the sides of the pan and a toothpick inserted comes out clean. Immediately turn the cakes out onto a wire rack to cool completely.
- Once cool, wrap the cakes in plastic wrap and freeze until ready to decorate. (Frozen cake layers will be much easier to frost!)
- In the bowl of a stand mixer fitted with a paddle attachment, beat the butter and cream cheese on high speed until smooth. Slowly add the sifted powdered sugar and mix on low speed until fully combined. Once all of the powdered sugar is added, continue beating on low speed until no more lumps or pockets of air remain and the frosting is smooth.
- Secure the first cake layer on the cake stand with a small amount of frosting on the bottom. Using an offset spatula, spread on an even layer of frosting, then place the second cake layer on top.
- Spread an even layer of frosting along the top and outside of the cake, then place in the fridge for about 10-15 minutes.
- Take the cake out of the fridge and spread a thicker layer of frosting on the cake. Use the remaining frosting to pipe along the top and bottom of the cake, if desired.
- Allow the cake to sit at room temperature for a few hours before serving.
Nutrition
Energy: 601 kcal | Total Fat: 36 g | Saturated: 21 g | Trans: 0 g | Unsaturated: 0 g | Cholesterol: 118 mg | Total Carbs: 67 g | Fiber: 1 g | Sugars: 52 g | Proteins: 6 g | Sodium: 265 mg | Polyunsaturated: 2 g | Monounsaturated: 10 g
©2026 OnlineCook LLC